Azure DevOps
In this tutorial, you’ll learn how to:
- Integrate NightVision DAST scans into your CI/CD pipelines to automatically find exploitable vulnerabilities within minutes.
- Use NightVision’s API Extraction to scan the source code to find the attack vector in the file and origin of code.
- Create Azure Board Issues so developers can view the vulnerabilities directly in Azure DevOps.
Workflow File:
Section titled “Workflow File:”## SETUP
## Run before activating pipeline# nightvision target create javaspringvulny-api https://127.0.0.1:9000 --type api# nightvision auth playwright create javaspringvulny-api https://127.0.0.1:9000
## Optional steps can be performed locally or in the pipeline# nightvision swagger extract . javaspringvulny-api --lang spring# nightvision scan javaspringvulny-api
trigger:- main
pool: vmImage: 'ubuntu-latest'
variables: NIGHTVISION_TARGET: javaspringvulny-api NIGHTVISION_AUTH: javaspringvulny-api TARGET_URL: https://localhost:9000
stages:- stage: Test jobs: - job: BuildAndTest steps: - checkout: self displayName: 'Clone Code'
- script: wget -c https://downloads.nightvision.net/binaries/latest/nightvision_latest_linux_amd64.tar.gz -O - | tar -xz; sudo mv nightvision /usr/local/bin/ displayName: 'Install NightVision'
- script: nightvision swagger extract ./ -t $NIGHTVISION_TARGET --lang java displayName: 'Extract API Documentation from Code' env: NIGHTVISION_TOKEN: $(NIGHTVISION_TOKEN)
- task: DockerCompose@1 displayName: 'Start the app with Docker Compose' inputs: action: 'run services' detached: true buildImages: true
- script: sleep 20; curl --retry 30 --retry-all-errors --retry-delay 1 --fail -k $TARGET_URL displayName: 'Wait for the app to start'
- script: | nightvision scan $NIGHTVISION_TARGET --auth $NIGHTVISION_AUTH > scan-results.txt nightvision export sarif -s "$(head -n 1 scan-results.txt)" --swagger-file openapi-spec.yml displayName: 'Scan the API' env: NIGHTVISION_TOKEN: $(NIGHTVISION_TOKEN)
- task: UsePythonVersion@0 inputs: versionSpec: '3.11' addToPath: true
- script: | python -m pip install --upgrade pip pip install sarif-manager sarif-manager azure create-work-items results.sarif \ --write-logs \ --org $(echo $(System.CollectionUri) | cut -d'/' -f4) \ --project $(System.TeamProject) \ --token $AZURE_DEVOPS_ACCESS_TOKEN displayName: 'Create Work Items in Azure DevOps' env: AZURE_DEVOPS_ACCESS_TOKEN: $(AZURE_DEVOPS_ACCESS_TOKEN)Preview: Example results
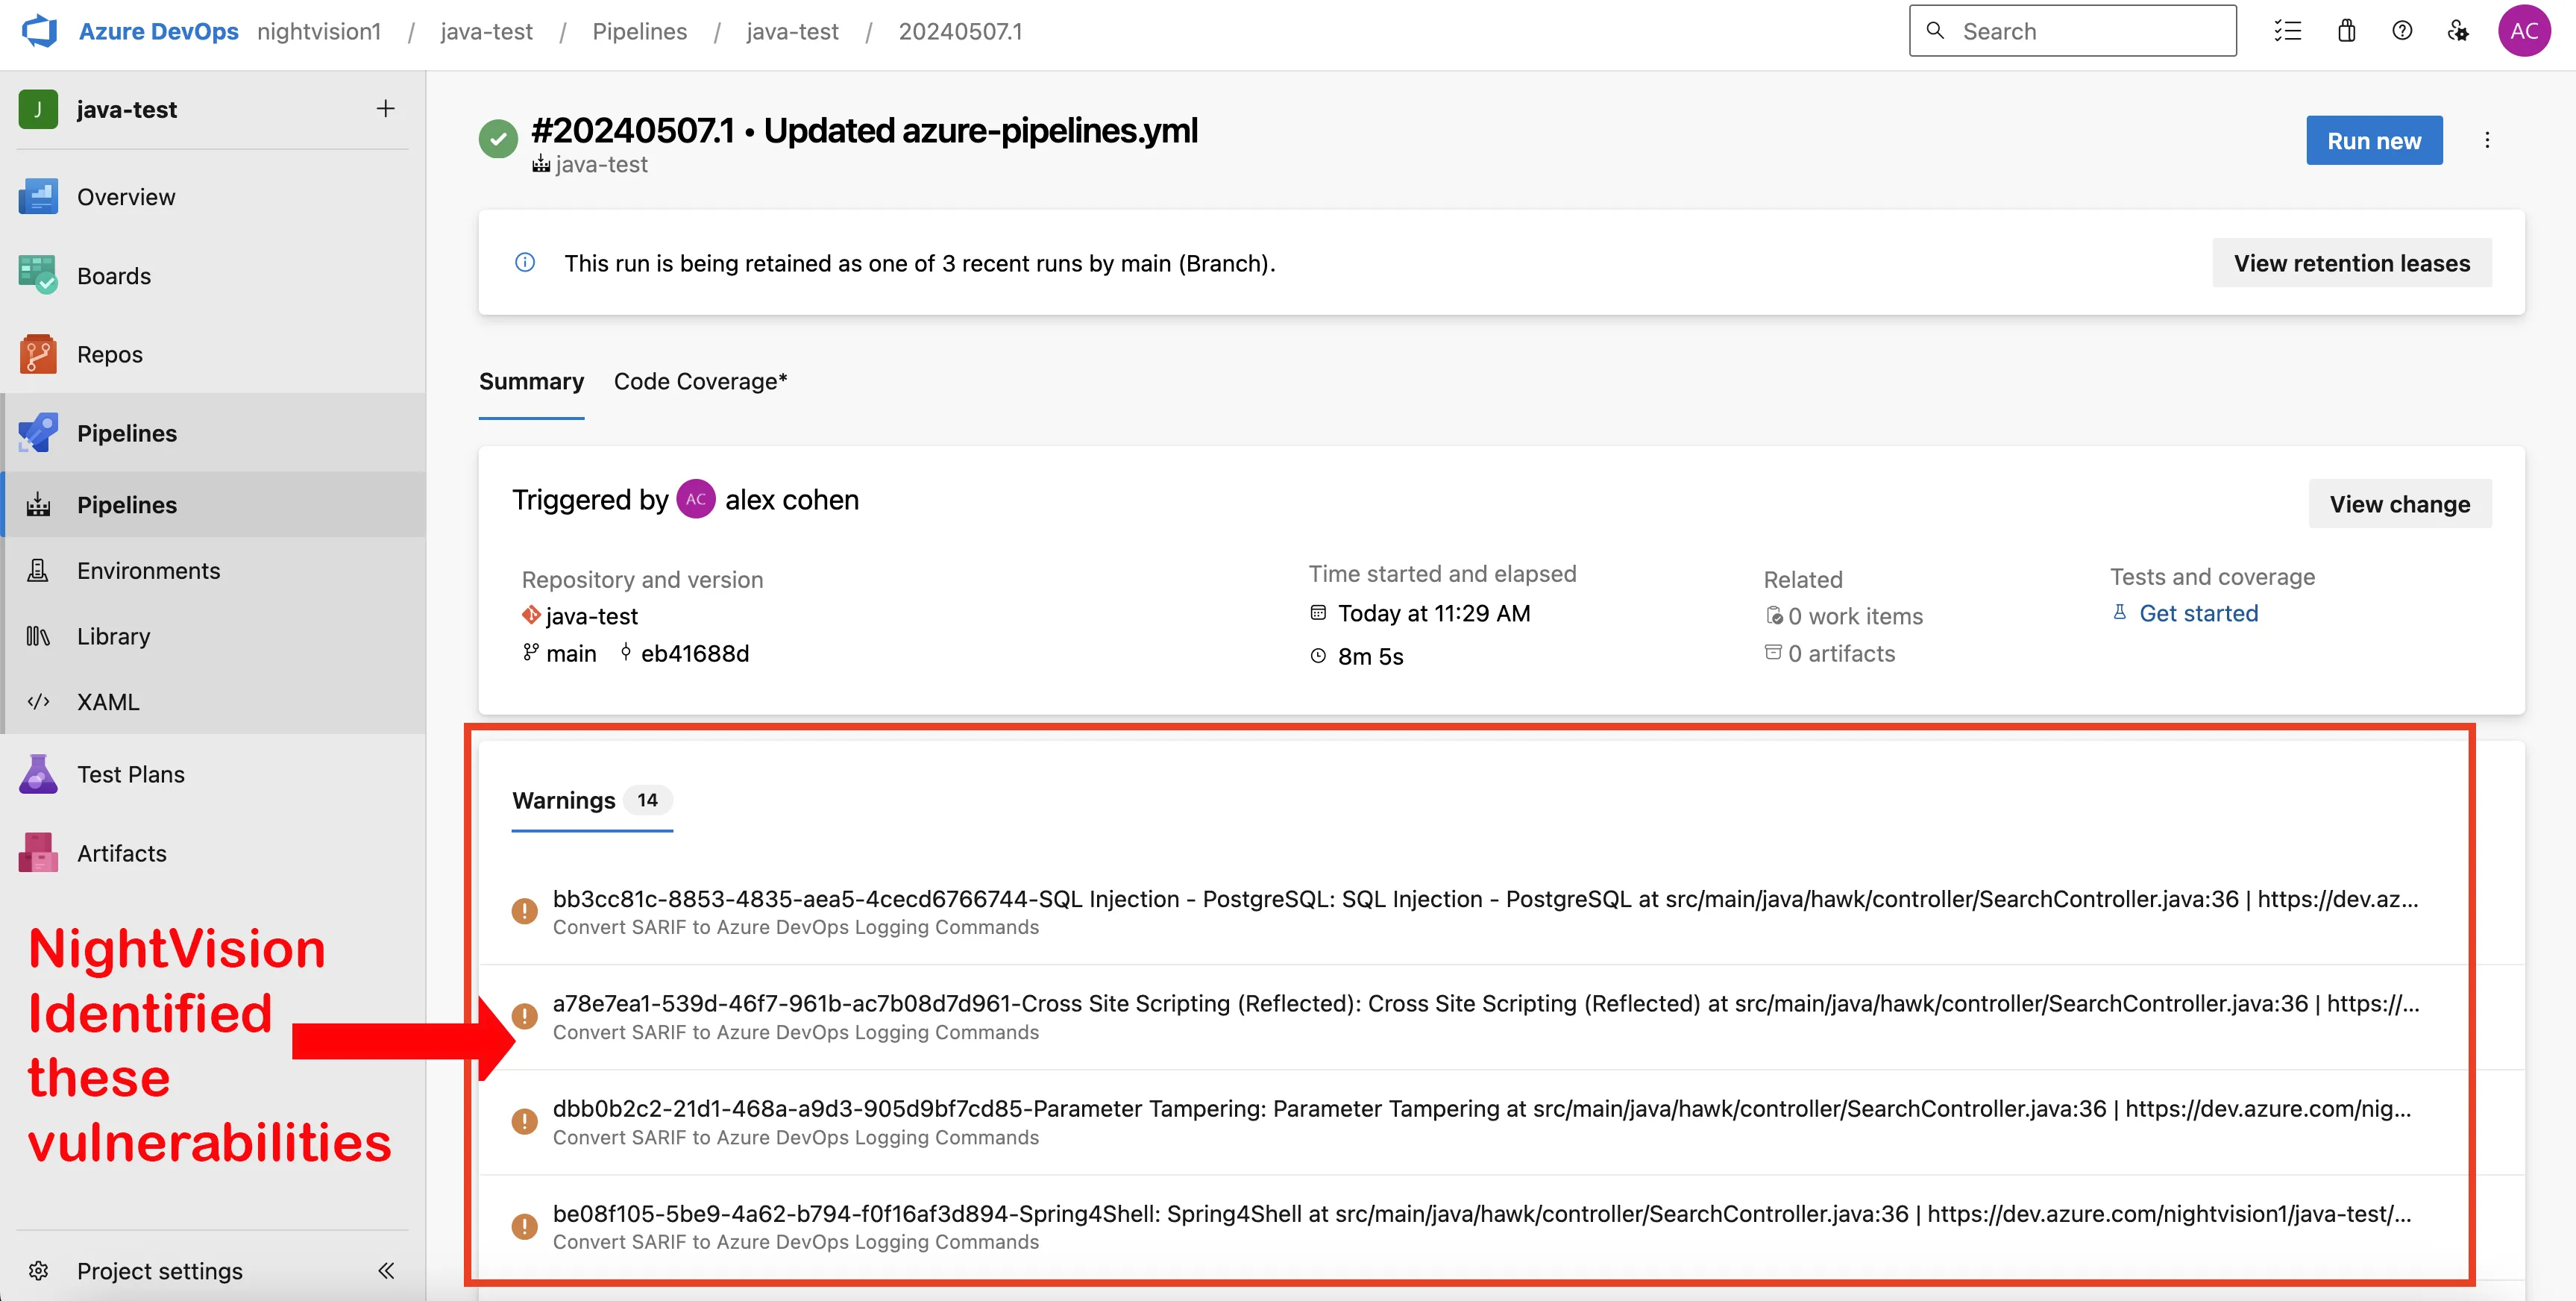
Section titled “Preview: Example results”Here’s what the results will look like:
Tutorial
Section titled “Tutorial”-
Once you run your first Public Web App Scan or Public API Scan this will create
AppandTargetobjects needed for scanning. -
Create a NIGHTVISION_TOKEN secret by clicking the
Generate API tokenbutton under your profile. -
Add a
azure-pipelines.yamlpipeline file to any Azure DevOps repository.
## SETUP
## Run before activating pipeline# nightvision target create javaspringvulny-api https://127.0.0.1:9000 --type api# nightvision auth playwright create javaspringvulny-api https://127.0.0.1:9000
## Optional steps can be performed locally or in the pipeline# nightvision swagger extract . javaspringvulny-api --lang spring# nightvision scan javaspringvulny-api
trigger:- main
pool:  vmImage: 'ubuntu-latest'
variables:  NIGHTVISION_TARGET: javaspringvulny-api  NIGHTVISION_AUTH: javaspringvulny-api  TARGET_URL: https://localhost:9000
stages:- stage: Test  jobs:  - job: BuildAndTest    steps:    - checkout: self      displayName: 'Clone Code'
    - script: wget -c https://downloads.nightvision.net/binaries/latest/nightvision_latest_linux_amd64.tar.gz -O - | tar -xz; sudo mv nightvision /usr/local/bin/      displayName: 'Install NightVision'
    - script: nightvision swagger extract ./ -t $NIGHTVISION_TARGET --lang java      displayName: 'Extract API Documentation from Code'      env:        NIGHTVISION_TOKEN: $(NIGHTVISION_TOKEN)
    - task: DockerCompose@1      displayName: 'Start the app with Docker Compose'      inputs:        action: 'run services'        detached: true        buildImages: true
    - script: sleep 20; curl --retry 30 --retry-all-errors --retry-delay 1 --fail -k $TARGET_URL      displayName: 'Wait for the app to start'
    - script: |        nightvision scan $NIGHTVISION_TARGET --auth $NIGHTVISION_AUTH > scan-results.txt        nightvision export sarif -s "$(head -n 1 scan-results.txt)" --swagger-file openapi-spec.yml      displayName: 'Scan the API'      env:        NIGHTVISION_TOKEN: $(NIGHTVISION_TOKEN)
    - task: UsePythonVersion@0      inputs:        versionSpec: '3.11'        addToPath: true
- script: | python -m pip install --upgrade pip pip install sarif-manager sarif-manager azure create-work-items results.sarif \ --write-logs \ --org $(echo $(System.CollectionUri) | cut -d'/' -f4) \ --project $(System.TeamProject) \ --token $AZURE_DEVOPS_ACCESS_TOKEN displayName: 'Create Work Items in Azure DevOps' env: AZURE_DEVOPS_ACCESS_TOKEN: $(AZURE_DEVOPS_ACCESS_TOKEN)- To trigger this pipeline regularly for automatic scan coverage, add a
schedule:
trigger:- main
schedules:- cron: "0 0 * * *" # Adjust the cron expression as needed  displayName: Daily midnight run  branches:    include:    - main
Azure Boards Traceback to Code origin
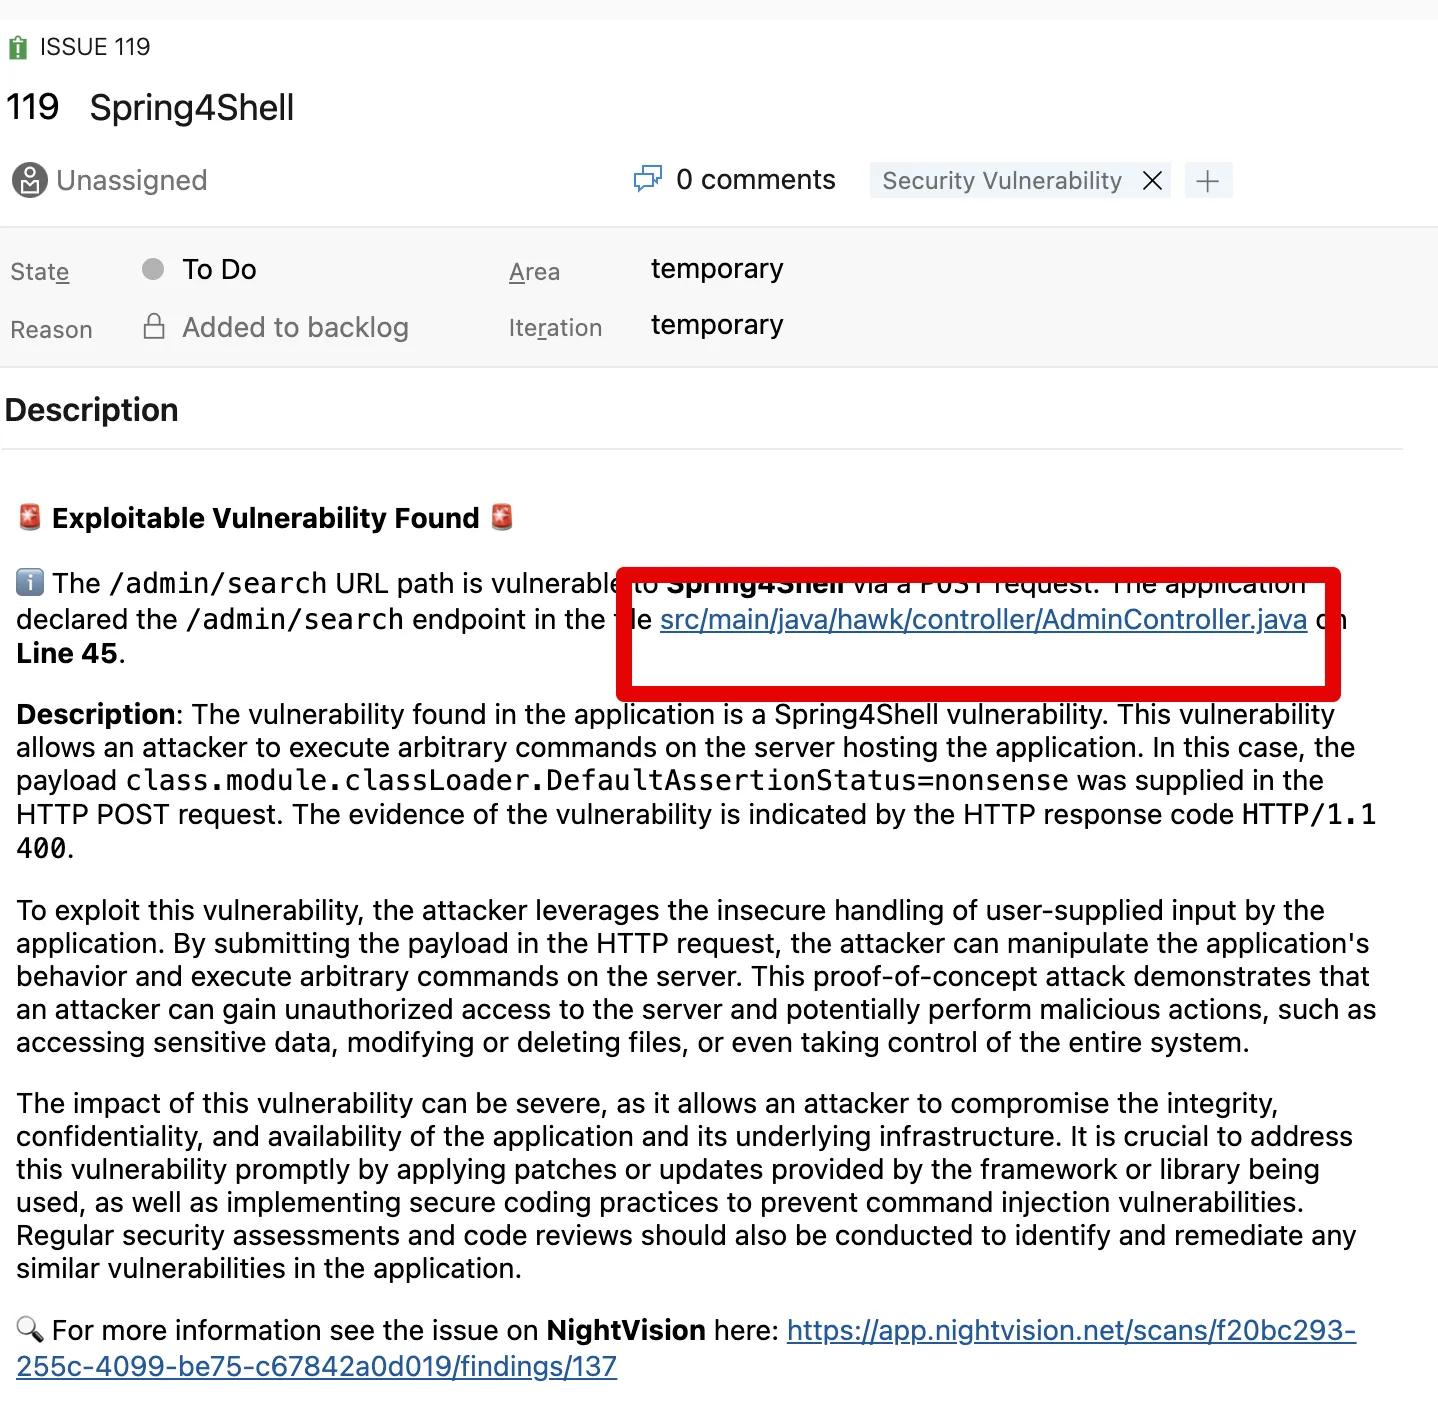
Section titled “Azure Boards Traceback to Code origin”Our optional Azure Boards integration will convert Sarif files produced by NightVision DAST scans into Azure Board Issues similar to GitHub Security Alerts!
Repository
Section titled “Repository”Requirements
Section titled “Requirements”There are three required values to create Azure Board Issues from NightVision SARIF.
- Locate your Azure DevOps Organization Name
- Locate your Azure DevOps Project Name
- Create an Azure DevOps Personal Access Token and save that in your Pipeline Variables.
Usage Example
Section titled “Usage Example”To run the nightvision_azure_importer.py script, you will need to specify the Azure DevOps organization, project, personal access token (PAT), and the path to the SARIF file containing the security findings. Here’s how you can execute the script from the command line:
- script: | python -m pip install --upgrade pip pip install sarif-manager sarif-manager azure create-work-items results.sarif \ --write-logs \ --org $(echo $(System.CollectionUri) | cut -d'/' -f4) \ --project $(System.TeamProject) \ --token $AZURE_DEVOPS_ACCESS_TOKEN displayName: 'Create Work Items in Azure DevOps' env: AZURE_DEVOPS_ACCESS_TOKEN: $(AZURE_DEVOPS_ACCESS_TOKEN)Instructions
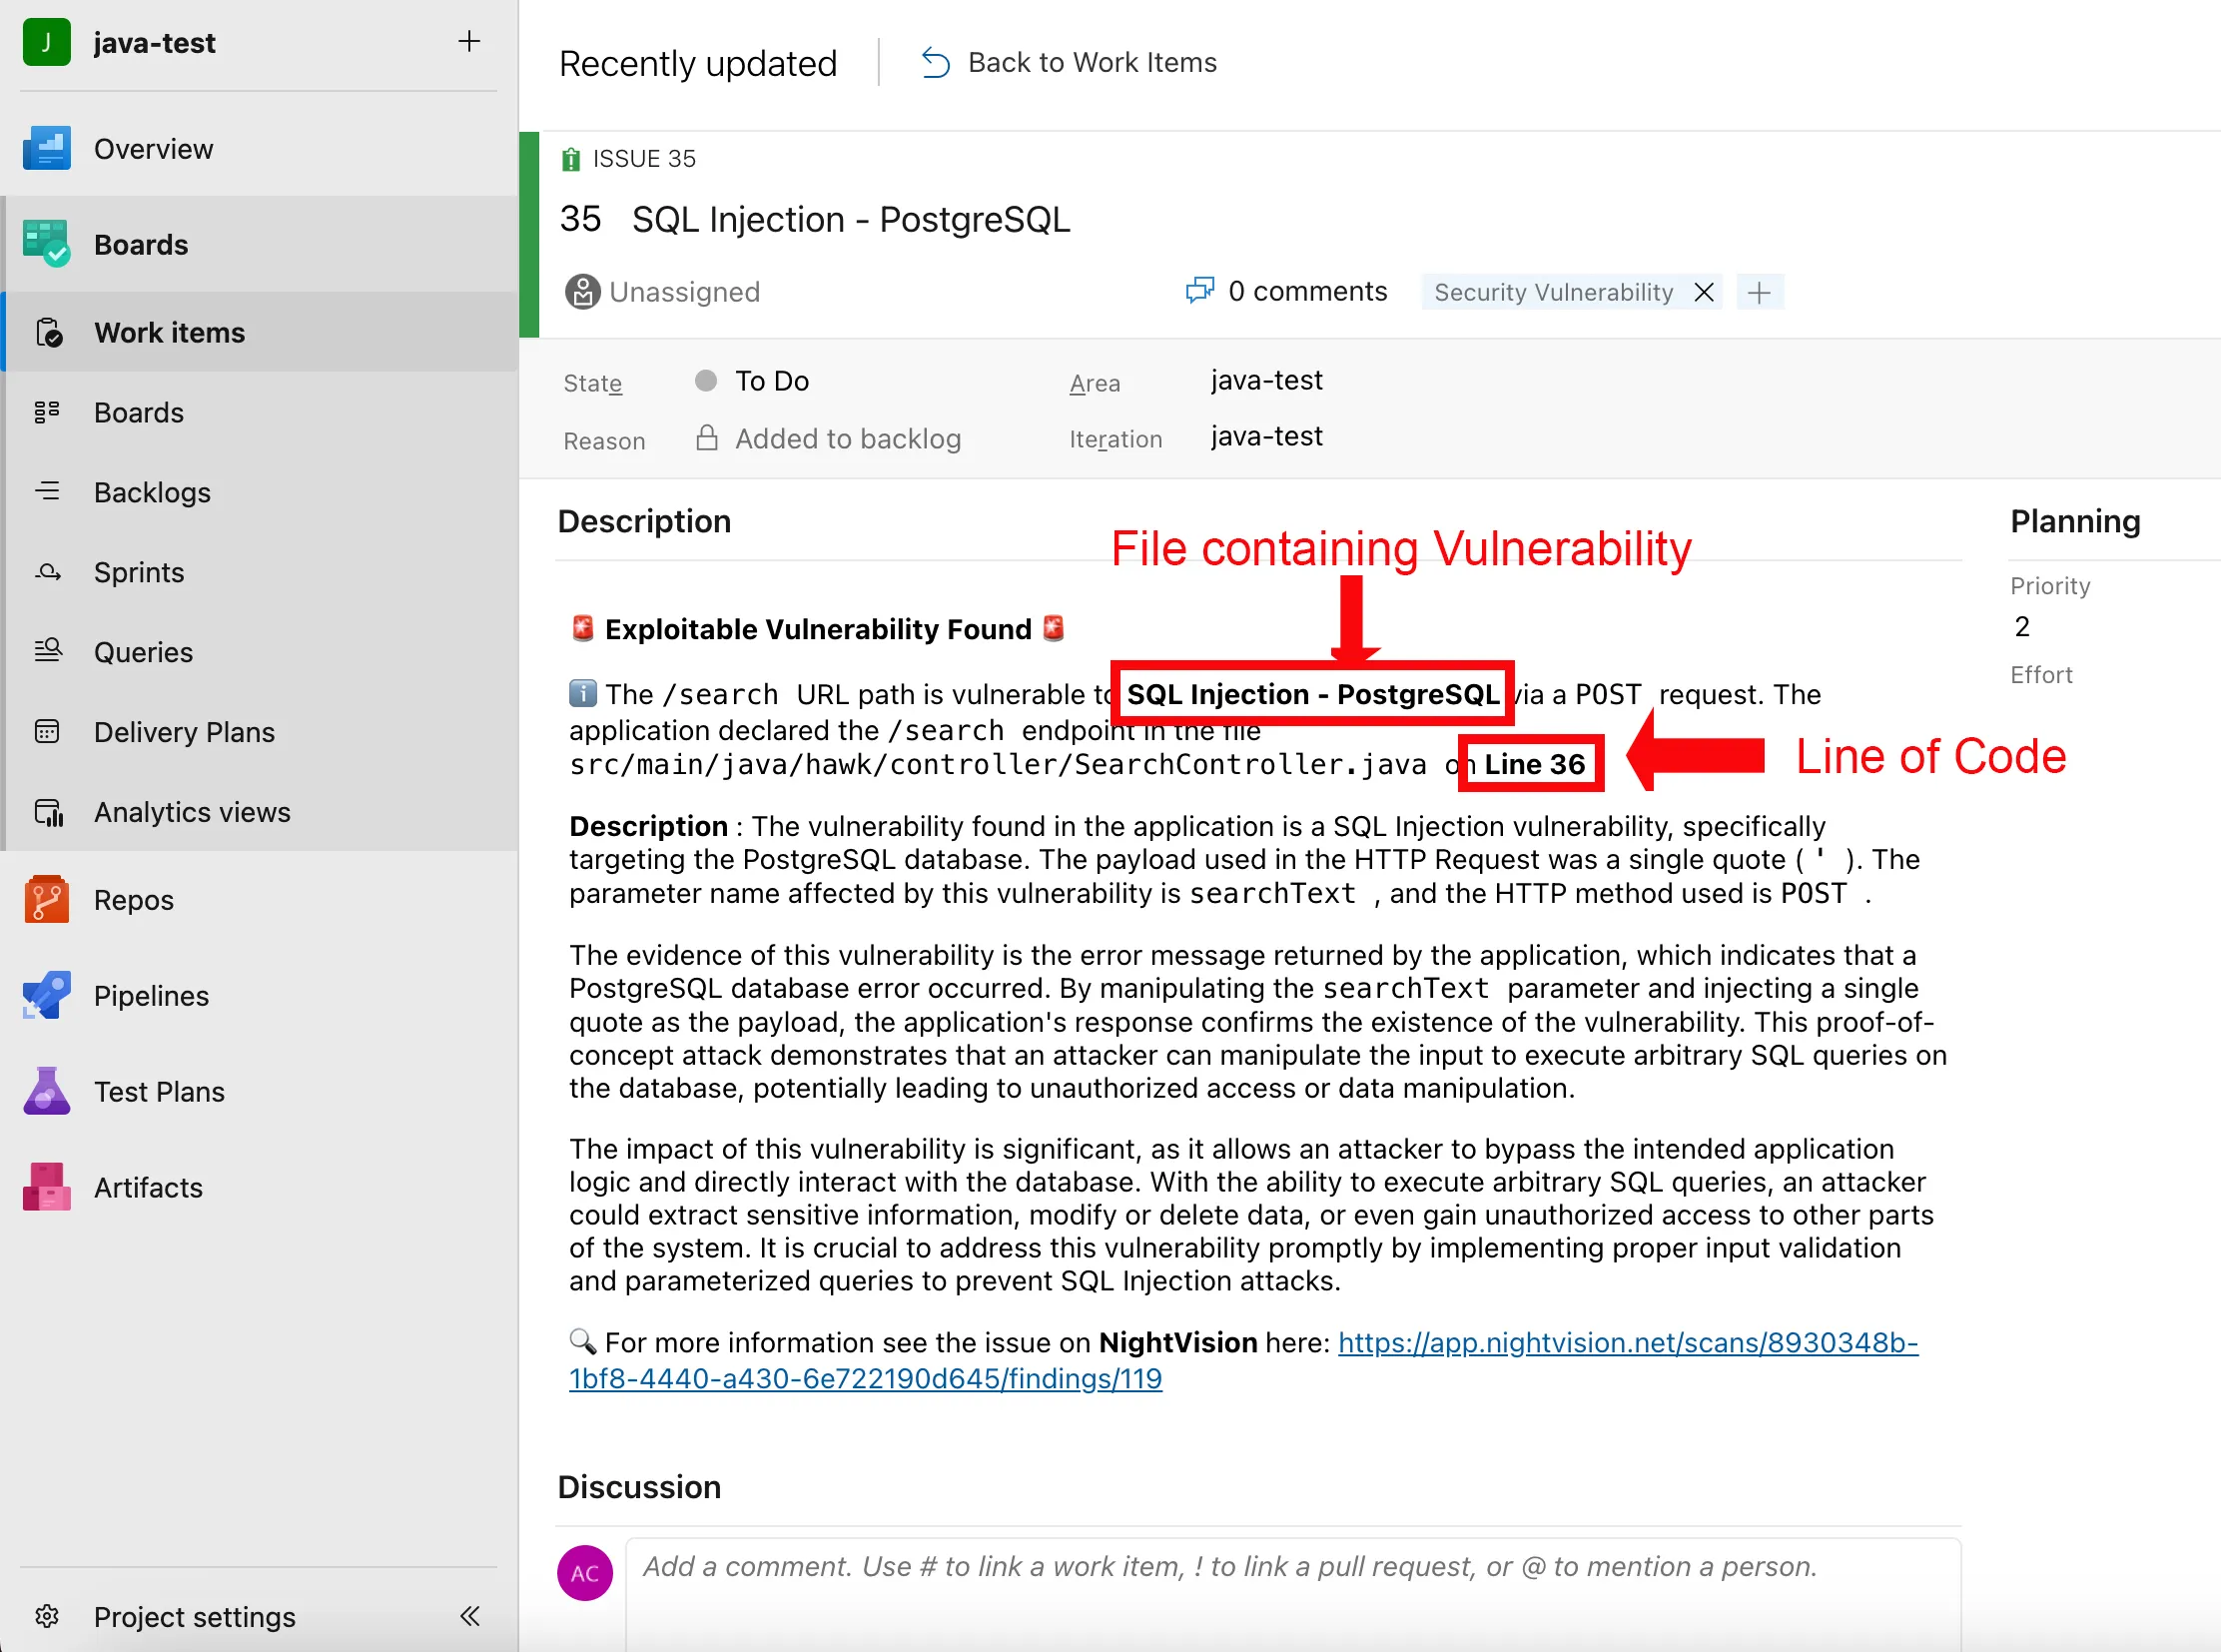
Section titled “Instructions”- Click on Boards on the left side of the screen.
- This will open the Work Items page, showing a list of current vulnerabilities.
- If you click on the Boards button below Work Items on the left side of the screen, it will show the issues in a To-do list fashion and which ones are being remediated.
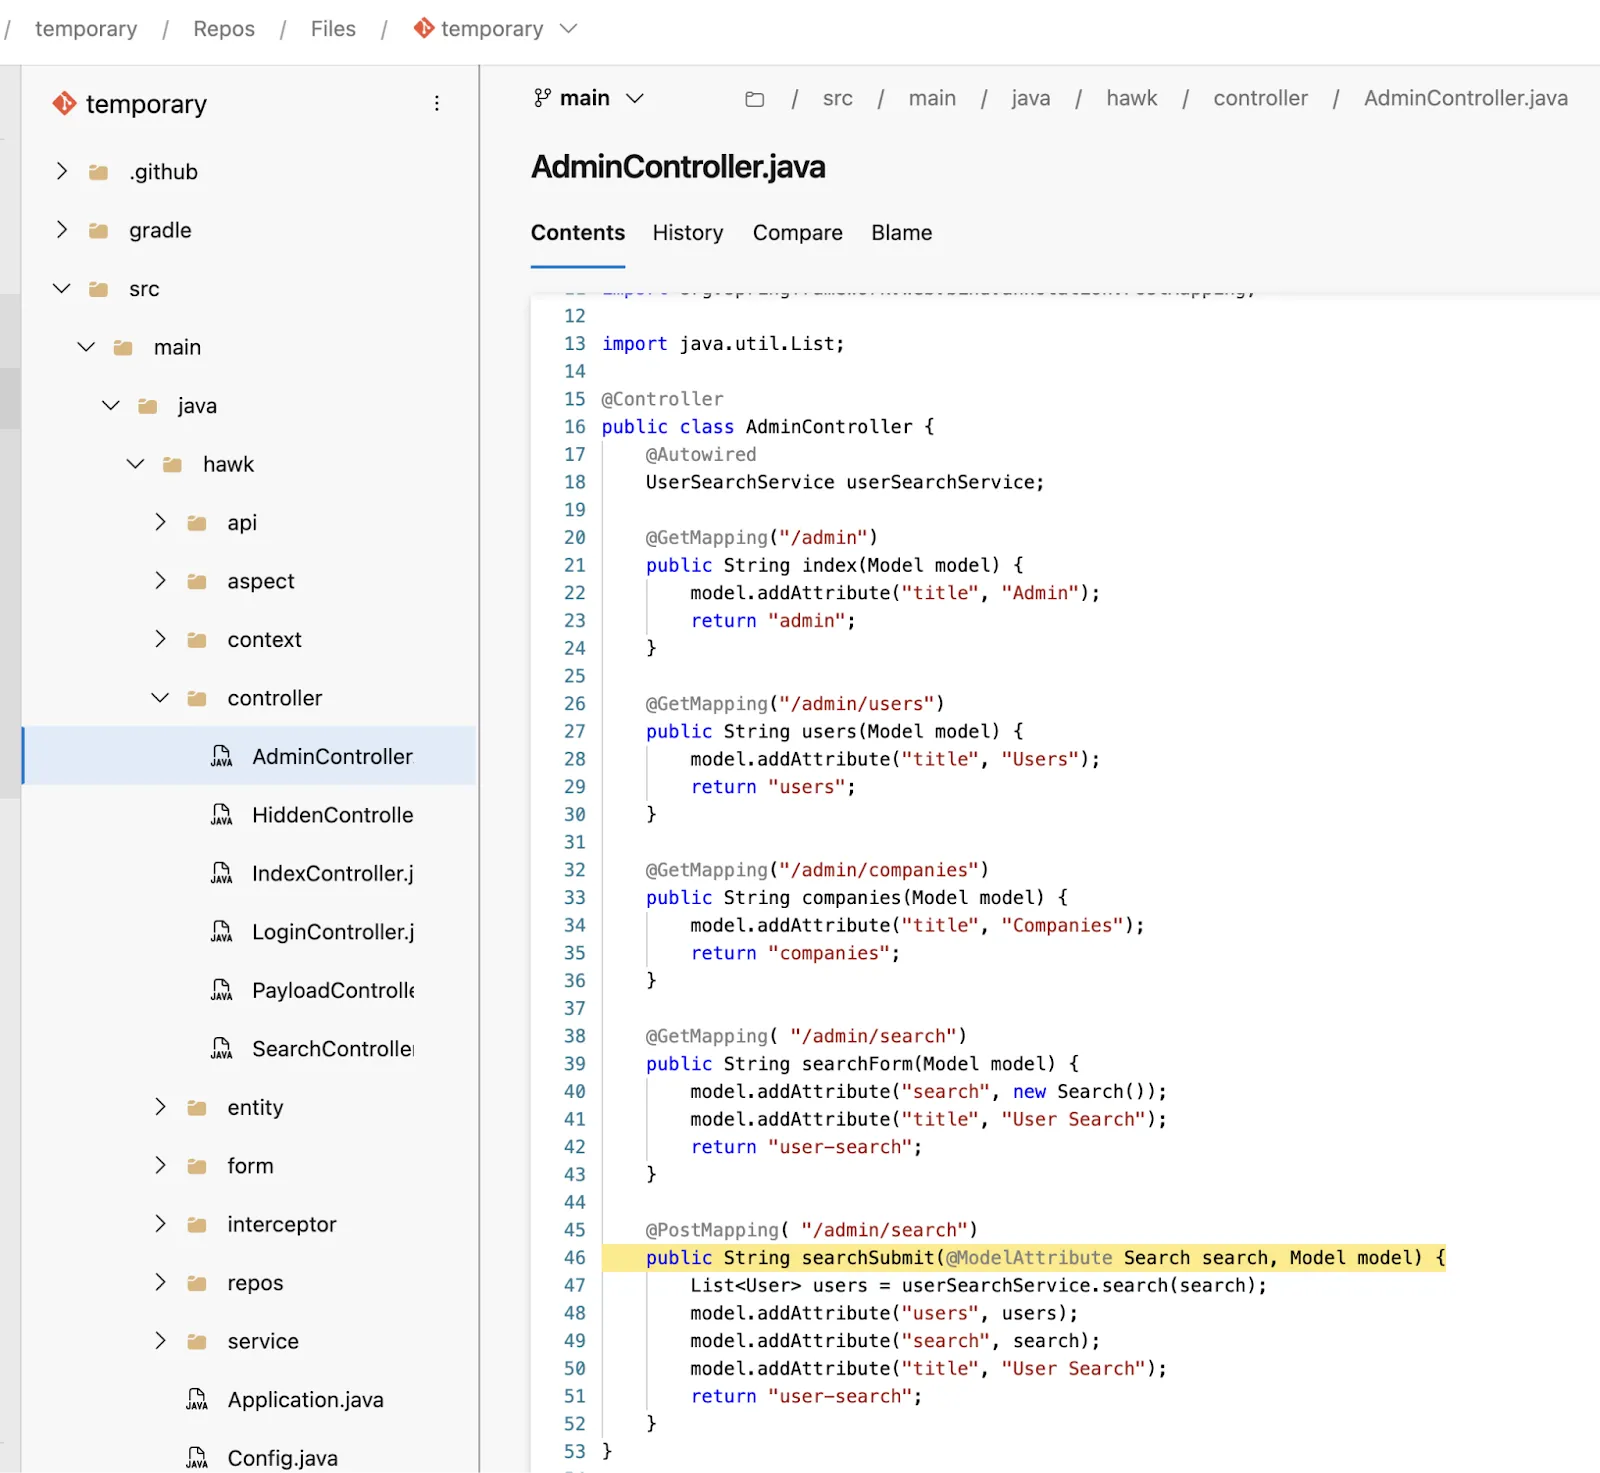
- Click on one of the Vulnerabilities. You will then see the same information about the vulnerability displayed on the NightVision platform. Also, at the top of the Description section, you will see the file path for the file on which the vulnerability was found and the specific line within the code from which it is coming. Clicking on the file path will take you to the origin of the code as seen in the images below.