Notification Apps
This repository contains scripts and configurations to interact with Jira and manage project vulnerabilities using NightVision SARIF reports.
Preview: Example Results
Section titled “Preview: Example Results”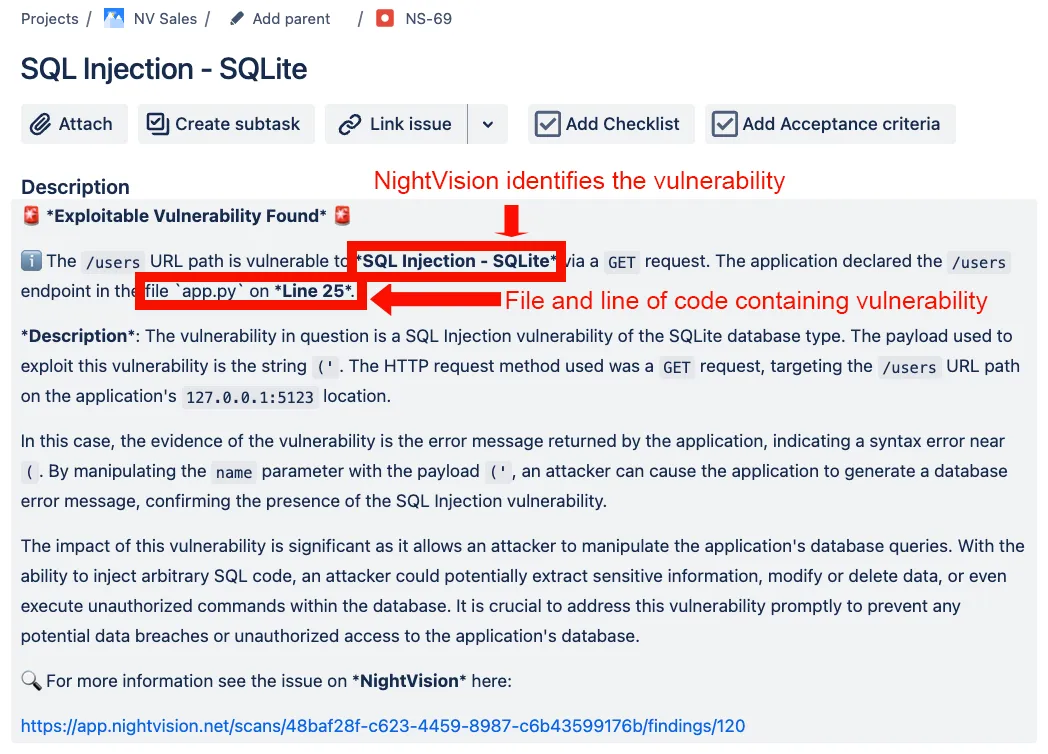 NightVision explains how the vulnerability was exploited, why it matters, and where to fix it.
Prerequisites
Section titled “Prerequisites”- Python 3.x
- Jira account and API token
- NightVision account
-
Clone the repository:
Terminal window git clone https://github.com/alex-nightvision/jira-issue-from-sarif.gitcd jira-issue-from-sarif -
Install required packages:
Terminal window pip install requests jira -
Set environment variables:
Terminal window export JIRA_API_TOKEN='your_jira_api_token'
Create Jira API Token
Section titled “Create Jira API Token”- Go to Jira API tokens.
- Create a new API token and copy it.
Find Jira Project IDs
Section titled “Find Jira Project IDs”-
Run the following command to get Jira project IDs:
Terminal window python get-jira-project-id.pyExample output:
Project ID: 10001Project Name: NightVisionProject Key: NVProject ID: 10004Project Name: NV SalesProject Key: NV
Create Tickets from SARIF
Section titled “Create Tickets from SARIF”-
Export NightVision SARIF report:
Terminal window nightvision export sarif -s "33a32558-bd24-44f0-aafa-224468d4b7f5" --swagger-file backup-openapi-spec.yml -
Create Jira tickets from the SARIF report:
Terminal window python sarif-to-jira.py
$ py get-jira-project-id.pyProject ID: 10001Project Name: NightVisionProject Key: NV
Project ID: 10004Project Name: NV SalesProject Key: NS
Create ticket
Section titled “Create ticket”nightvision export sarif -s "33a32558-bd24-44f0-aafa-224468d4b7f5" --swagger-file backup-openapi-spec.ymlpy sarif-to-jira.pyWe can generate a PDF document from the SARIF created via the nightvision swagger export command into many formats. The code can be found in the following repo:
Preview: Example Results
Section titled “Preview: Example Results”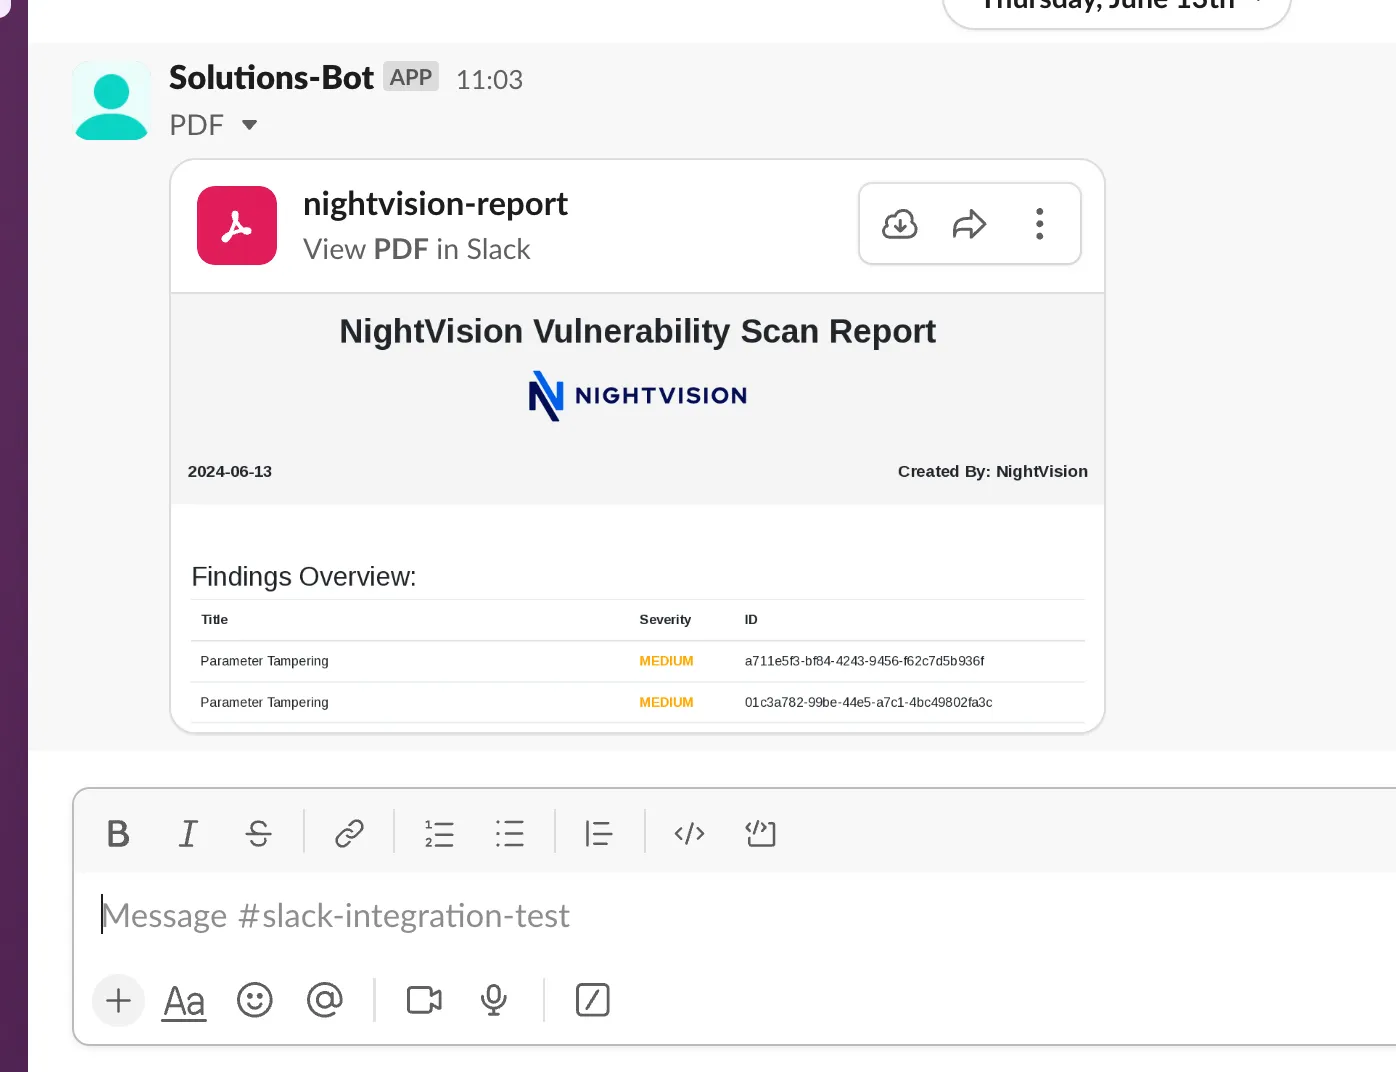 NightVision seamlessly integrates into Slack.
Creating a Slack token:
Section titled “Creating a Slack token:”-
First, create a Slack app by going to (Slack API token create).
-
Create a new app by clicking on
Create New Appbutton and then ChooseFrom scratchoption. -
Enter a name for your app (e.g., NightVisionApp) and select the Slack workspace where you want to install it.
-
Now click the
Create Appbutton. -
After that, navigate to
OAuth & Permissionsunder theFeaturessection in the sidebar. -
Under
Scopes, add necessary scopes such as:chat:writeto send messages.files:writeto upload files.chat:write.publicto Send messages to channels @NightVision isn’t a member of. (optional)
-
Now in the
OAuth & Permissionspage, click theInstall App to Workspacebutton to Authorize the permissions you have just configured. -
After installing the app, you’ll redirected back to the
OAuth & Permissionspage. Here, you can find yourBot User OAuth Access Token. This token usually begins with xoxb-. -
Now go to your Slack workspace where the app was installed. In the channel where you want your app to post messages, type: /invite @YourBotName. (eg. /invite @nightvisionApp).
Adding the NightVision Slack Importer to a pipeline:
Section titled “Adding the NightVision Slack Importer to a pipeline:”Adding the tool to any pipeline is very easy. You can take a look at the following GitHub workflow where the tool is included in the pipeline:
      - name: (7) Install nightvision slack importer and dependencies        run: |          git clone https://github.com/jxbt/nightvision_slack_importer.git          cd nightvision_slack_importer          sudo apt-get update          sudo apt-get install -y python3-pip python3-venv google-chrome-stable          python3 -m venv .venv          source .venv/bin/activate          pip3 install -r requirements.txt
      - name: (8) Run NightVision Slack Importer        run: |          cd nightvision_slack_importer          source .venv/bin/activate          python3 nightvision_slack_importer.py --sarif ../results.sarif --token ${{ env.SLACK_TOKEN }} --channel ${{ env.SLACK_CHANNEL_ID }}
Local PDF without slack
Section titled “Local PDF without slack”You can also create this PDF locally with the following:
# this will make a results.sarif filenightvision export sarif -s $SCANID --swagger-file $PATH/$TO/openapi-spec.yml
# then download the repo and run the python script to make a pdf reportgit clone https://github.com/alex-nightvision/nightvision_slack_importer.git
cd nightvision_slack_importer
pip3 install -r requirements.txtpython nightvision_slack_importer.py -l -f $PATH/$TO/results.sarif
NightVision Mail Integration
Section titled “NightVision Mail Integration”NightVision Mail Integration Repository
Description
Section titled “Description”NightVision Mail Integration is a tool used to automate importing security vulnerability findings from a NightVision scan results file into user-friendly PDF reports and sharing these reports via email (e.g., Gmail or Outlook).
Installation
Section titled “Installation”-
Clone the Repository:
Terminal window git clone https://github.com/jxbt/nightvision_mail_reporter.gitcd nightvision_mail_reporter -
Install Dependencies:
Terminal window chmod +x install.sh && sudo ./install.shpython3 -m venv .venvsource .venv/bin/activatepip3 install -r requirements.txt
To use the NightVision Mail Reporter, provide the path to your SARIF file along with your Email Settings:
source .venv/bin/activatepython3 main.py --sarif r.sarif --sender your_email@example.com --password "your_email_password" --receiver receiver_email@example.com --outlookFlags:
Section titled “Flags:”| Flag | Description |
|---|---|
| -s, —sarif | Path to the SARIF file containing the security analysis results. |
| -o, —out | Path to the output PDF file. |
| —sender | The sender’s email address. |
| —password | The sender’s email password. |
| —receiver | The receiver’s email address. |
| —server | The SMTP server address. |
| —port | The SMTP server port. |
| —gmail | Use Gmail’s SMTP server (sets server to smtp.gmail.com and port to 587). |
| —outlook | Use Outlook’s SMTP server (sets server to smtp-mail.outlook.com and port to 587). |
Note: For Gmail, you must create and use a Google App Password. This is because Google does not allow access to your Gmail account using just your Gmail password when accessing third-party apps.
Examples
Section titled “Examples”- To run the script and send an email using Gmail’s SMTP server:
source .venv/bin/activatepython3 main.py --sarif r.sarif --sender your_email@gmail.com --password "your_email_password" --receiver receiver_email@example.com --gmail- To run the script and send an email using Outlook’s SMTP server:
source .venv/bin/activatepython3 main.py --sarif r.sarif --sender your_email@outlook.com --password "your_email_password" --receiver receiver_email@example.com --outlook- To run the script and send an email using a custom SMTP server:
source .venv/bin/activatepython3 main.py --sarif r.sarif --sender your_email@outlook.com --password "your_email_password" --receiver receiver_email@example.com --server smtp.example.com --port 1337Microsoft Teams
Section titled “Microsoft Teams”Description
Section titled “Description”NightVision can seamlessly integrate into Teams, where a PDF can be generated from the SARIF created via the nightvision swagger export command. The code can be found in the following repo:
Preview: Example Results
Section titled “Preview: Example Results”- Clone the repository:
git clone https://github.com/jxbt/nightvision_ms_teams_importer.gitcd nightvision_ms_teams_importer
- Install Dependencies
python3 -m venv .venvsource .venv/bin/activatepip3 install -r requirements.txt
To use the NightVision Teams integration, provide the path to your SARIF file along with your Microsoft Teams webhook URL:
source .venv/bin/activate python3 nightvision_teams_importer.py --sarif <path_to_sarif_file> --webhook <webhook_url>| Flag | Description |
|---|---|
| -s, —sarif | Path to the SARIF file containing the security scan results. |
| -w, —webhook | Microsoft Teams webhook URL. |